
QuickTime Player and the Screenshot toolbar (⇧⌘5) are built into every Mac and handle simple screen recordings well. A QuickTime alternative for screen recording such as TinyRecorder makes sense when you need things the built-in tools don’t offer on your version of macOS: system audio before macOS 27, several windows or a whole app at once, MP4 output, a webcam overlay, or audio-only recording. Both are free; QuickTime needs no install.
QuickTime and the Screenshot toolbar are one tool
On current macOS, choosing File › New Screen Recording in QuickTime Player opens the same Screenshot toolbar you get with ⇧⌘5. Recording an iPhone or iPad is different: that goes through QuickTime’s File › New Movie Recording. This article calls the built-in tools “QuickTime” for short, and the facts below come from Apple’s own guides: How to record the screen on your Mac, Take screenshots or screen recordings on Mac, and the QuickTime Player User Guide.
Several features depend on your macOS version. Apple added window recording and HDR capture to the Screenshot toolbar in macOS Tahoe 26, and system audio in macOS 27. If you are on an older version, those rows in the table below are “no” for QuickTime.
QuickTime vs TinyRecorder: comparison table
| QuickTime / Screenshot toolbar | TinyRecorder 1.8.13 | |
|---|---|---|
| Install | Built in | Download (free) |
| Cost | Free | Free, open source (AGPL-3.0) |
| Full screen, part of the screen | Yes | Yes |
| Single window | Yes, macOS 26 or later | Yes, macOS 12.3 or later |
| Several windows or a whole app | No | Yes |
| System audio | Yes, macOS 27 or later (“Include System Audio”) | Yes, macOS 13 or later |
| Microphone | Yes | Yes, with optional echo cancellation |
| Audio-only recording | Via QuickTime’s New Audio Recording (microphone) | System audio and/or mic; AAC, MP3, Opus, ALAC, FLAC |
| iPhone / iPad over USB | Yes (New Movie Recording) | Yes (Mobile Device) |
| Recording format | MOV | MP4 or MOV, H.264 or H.265 |
| Export | 4K, 1080p, 720p, 480p, H.264 or HEVC; audio only (M4A); no MP4 | Saves directly in the chosen format |
| HDR | Yes, macOS 26 or later on supported Macs | Yes, macOS 15 or later with a hardware H.265 encoder |
| Frame rate choice | Not among the documented options | 10 to 240 fps (actual rate depends on the Mac and content) |
| Webcam overlay | No | Yes, floating camera; Presenter Overlay on macOS 14 or later |
| Show pointer / clicks | Yes | Record cursor, highlight cursor, screen magnifier |
| Countdown timer | Yes | Yes |
| Editing | Trim, split, rearrange clips, rotate | Basic trimmer |
Where QuickTime is the better choice
It is already there. Nothing to download, no permissions to grant beyond what macOS asks for, and nothing to keep updated. On a work Mac where you can’t install apps, this settles it.
Editing. QuickTime Player can trim, split a movie into clips, rearrange and delete clips, and rotate. TinyRecorder’s trimmer only cuts the start and end.
Export presets. QuickTime’s File › Export As produces 4K, 1080p, 720p or 480p versions, H.264 or HEVC, and can export the audio alone. That is handy for making a smaller copy of a long recording.
macOS 27 closes the biggest gap. With “Include System Audio” in the Screenshot toolbar, you no longer need a virtual audio driver for a basic recording with sound, as long as you are on macOS 27 or later.
Where TinyRecorder adds something
System audio on older macOS
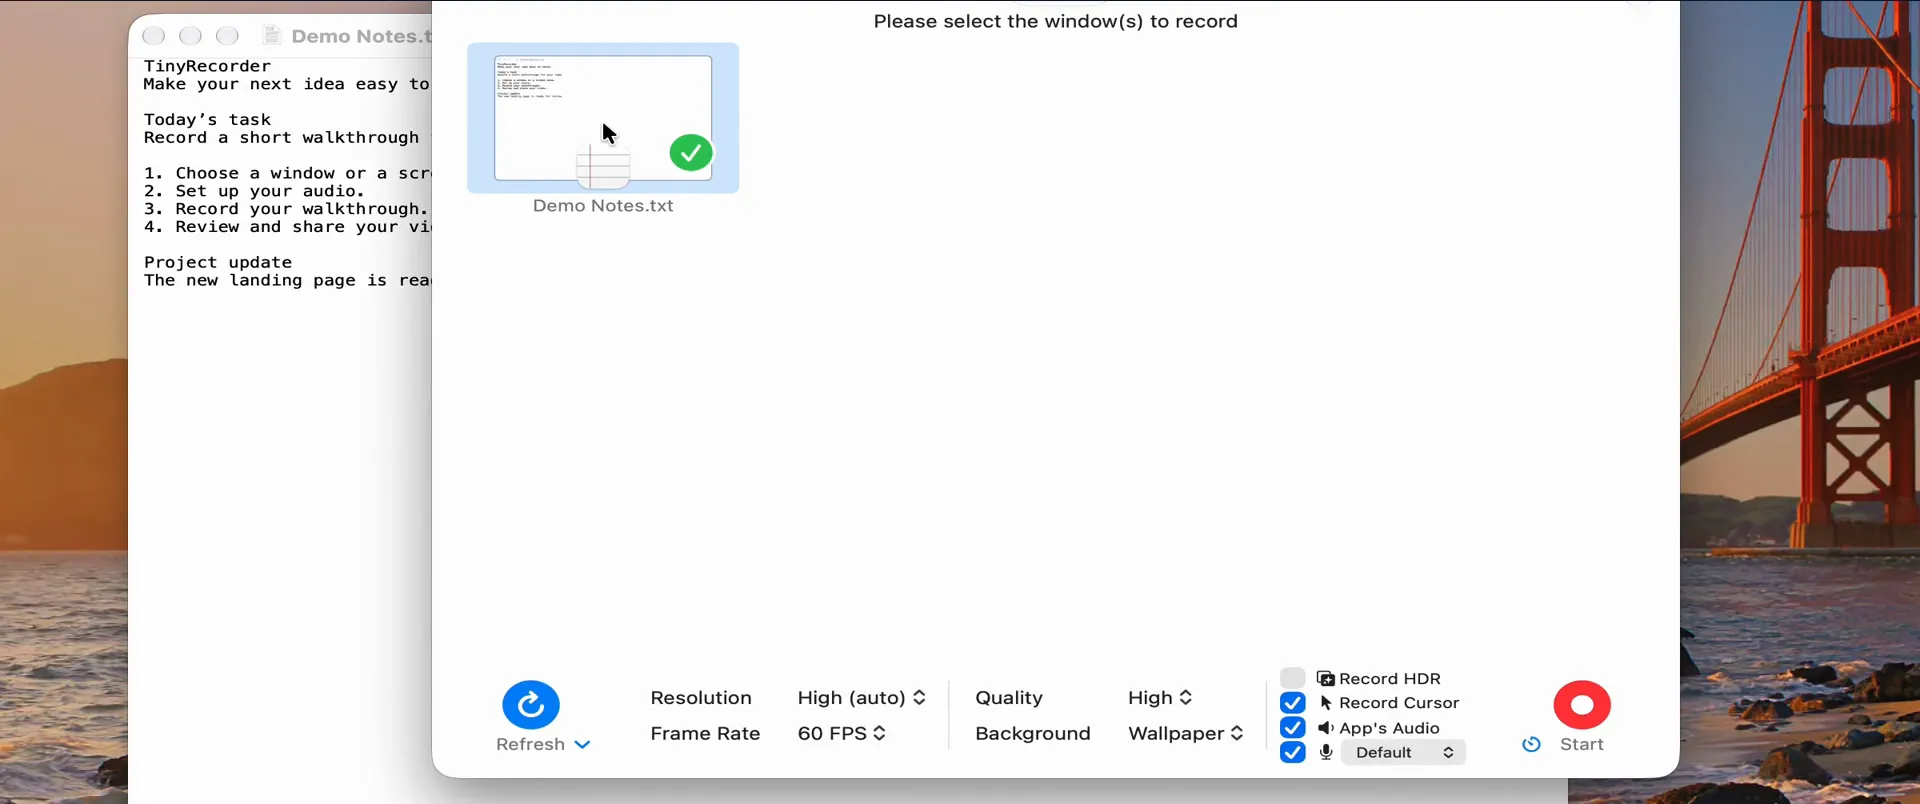
On macOS 13 through 26, the built-in recorder only offers a microphone. The usual workaround is a virtual audio driver such as BlackHole. TinyRecorder captures system audio through Apple’s ScreenCaptureKit on macOS 13 and later, so no driver is needed. Check App’s Audio in the picker, and optionally the microphone. The step-by-step version is in how to screen record on Mac with internal audio.

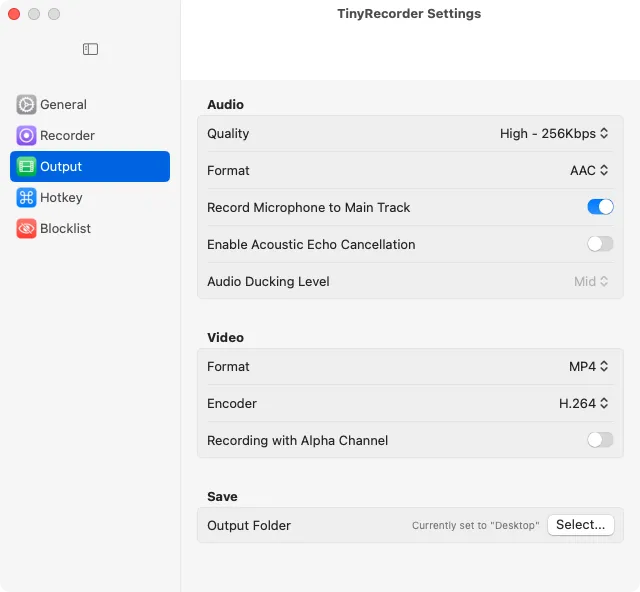
When you record the microphone too, TinyRecorder mixes it into the main audio track after you stop, or keeps it on a separate track if you prefer. Echo cancellation helps when you record with speakers instead of headphones.
Windows and apps, not just rectangles
The Screenshot toolbar records one window on macOS 26 and later. TinyRecorder records one window or several at once, or every window of one app, and keeps recording the window even when something else covers it. You choose what fills the space around the windows: your wallpaper, a solid color, or a transparent background. See how to record a window on Mac.
Formats you can upload directly
QuickTime records MOV and doesn’t export MP4. Most sites accept MOV, but some forms, LMSs and chat tools want MP4. TinyRecorder records straight to MP4 or MOV, with H.264 for compatibility or H.265 for smaller files. For audio-only recordings it offers AAC, MP3, Opus and the lossless ALAC and FLAC.
Webcam overlay and presenter features
The Screenshot toolbar has no camera option. TinyRecorder can show a floating webcam image (rectangle or circle) that is recorded with the screen, and supports Presenter Overlay on macOS 14 and later. It also has a cursor highlight and a screen magnifier for tutorials.
Control while recording
Stop, pause and resume from the menu bar or with keyboard shortcuts, discard a bad take with one shortcut (the file goes to the Trash), save the current frame as an image, and copy the finished recording to the clipboard. Recordings can also be started and stopped from AppleScript; see automation.
iPhone and iPad: both work
QuickTime can record a connected iPhone or iPad: File › New Movie Recording, then pick the device as the camera. TinyRecorder does the same from Mobile Device in its toolbar, with a quality preset and an optional mute. Neither installs anything on the phone. Pick whichever you already use; details are in how to record an iPhone screen on a Mac.
When QuickTime is enough
Stick with QuickTime and the Screenshot toolbar if:
- You record the full screen or an area, with or without your voice.
- You are on macOS 27 or later and need system audio in a simple recording.
- You only need one window and you are on macOS 26 or later.
- MOV is fine for where the video is going, or you can convert it.
- You want to trim or split the result without another app.
- You can’t or don’t want to install software.
Consider TinyRecorder if you are on macOS 13 to 26 and need system sound, record several windows or a whole app, want MP4 output, a webcam overlay, or audio-only recordings in MP3 or FLAC. It is also a good fit if you want to control recordings with shortcuts or scripts.
TinyRecorder is free with no account, ads, watermark or time limit, and recordings stay on your Mac. It does send anonymous usage statistics by default, which you can turn off in Settings › General; see the privacy page.
If something doesn’t work
QuickTime recording has no system sound. On macOS 26 and earlier, the built-in recorder can’t capture it. On macOS 27, choose Include System Audio in the toolbar’s Options menu before you start.
TinyRecorder recording has no sound. Check App’s Audio before clicking Start, and make sure TinyRecorder is allowed under System Settings › Privacy & Security › Screen & System Audio Recording. If the toggle is on but recording fails, use Settings › General › Screen Recording Permission › Repair… in TinyRecorder.
The iPhone isn’t listed. In either app, reconnect the cable, unlock the phone and tap Trust if asked. TinyRecorder needs the Camera permission for this, because macOS treats the phone as a camera.
Next steps
- Download TinyRecorder: free, runs on macOS 12.3 or later.
- See the full list of features or read the FAQ.
- Used QuickRecorder before? Read about TinyRecorder as a QuickRecorder alternative.