
Before macOS 27, the Mac’s built-in screen recorder could record your microphone but not the sound your Mac plays. To screen record on Mac with internal audio on macOS 13 or later, use an app that captures system audio directly, such as TinyRecorder: pick what to record, leave App’s Audio checked, and click Start. No BlackHole or other virtual audio driver is needed.
On macOS 27, the Screenshot toolbar can also include system audio; see below for when that is enough. TinyRecorder is free and open source.
What macOS can do on its own
On macOS 26 and earlier, the Screenshot toolbar (⇧⌘5) and QuickTime Player only offer a microphone as the audio source. Neither lists the Mac’s own output. If you pick the built-in microphone, you get a muffled copy of your speakers plus the room, or nothing at all with headphones on. The usual workaround is a virtual audio driver such as BlackHole. It works, but it adds setup steps and changes how your Mac’s audio output behaves (more on that below).
macOS 27 adds an Include System Audio option to the Screenshot toolbar’s screen recording (Apple’s guide). If you are on macOS 27 and just need a quick recording with sound, that may be all you need. TinyRecorder is still useful when you are on macOS 13–26, want only one app’s sound, want your microphone mixed in with echo cancellation, or need audio-only recordings in formats such as MP3 or lossless FLAC.
Since macOS 13, Apple’s ScreenCaptureKit framework lets an app capture system audio together with the screen. TinyRecorder uses it, so the sound goes straight into the recording without rerouting your audio.
How to screen record on Mac with internal audio in TinyRecorder
-
Download TinyRecorder and open it. The first-launch guide asks for the Screen Recording permission (the app restarts once) and, optionally, the microphone.
-
In the toolbar, pick a mode: Screen, Screen Area, Application or Window.

-
Select what to record. For example, click a display in the screen picker, or click one or more windows in the window picker.
-
In the bar at the bottom, make sure App’s Audio is checked. This is the setting that records your Mac’s sound.
-
Optional: check the microphone box and choose a device from the menu next to it if you also want your voice.

-
Click Start. If you set a countdown, recording begins when it ends.
-
To stop, click the stop button in the menu bar. The pause and resume button sits next to it, and you can also set keyboard shortcuts for both in Settings.
The file is saved to your output folder (the Desktop unless you changed it in Settings › Output).
Which mode records which sound
- Screen and Screen Area record all system audio, except from apps you added to the Blocklist.
- Application records the sound of the chosen app, including helper processes it plays audio through (for example, a web app running in a browser). Notification sounds from other apps stay out.
- Window works well for a single app window. See how to record a window on Mac for multi-window recordings.
If you only need the sound and no video, use System Audio in the toolbar instead. That is covered in how to record system audio on Mac.
Recording system audio and your microphone together
With both App’s Audio and the microphone on, the setting Record Microphone to Main Track in Settings › Output decides what you get:
- On (default): after you stop, TinyRecorder mixes your voice and the system sound into one audio track. This plays correctly everywhere and is what most people want for tutorials and demos.
- Off: your voice and the system sound stay on separate tracks. Use this if you edit in an app like Final Cut Pro or DaVinci Resolve and want to set their levels independently. Some players play only one audio track, so a file with separate tracks can sound like it is missing the mic.
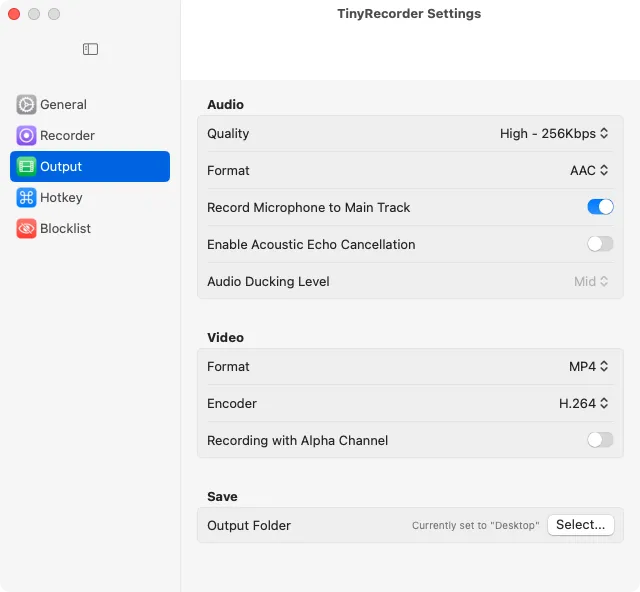
If you record with speakers instead of headphones, your microphone picks up the system sound as well, which causes an echo. Wear headphones, or turn on Enable Acoustic Echo Cancellation. On macOS 14 and later you can also set Audio Ducking Level, which controls how much other audio is lowered while echo cancellation is active.
If something doesn’t work
The recording has no sound
- Check that App’s Audio was checked in the picker before you clicked Start. It is easy to miss.
- Make sure the app was actually playing audio and wasn’t muted. TinyRecorder records what the app outputs, so a muted browser tab or a player set to zero records silence.
- In Application mode, only the chosen app’s sound is recorded. If the sound comes from another app, use Screen instead.
- Check the permission: System Settings › Privacy & Security › Screen & System Audio Recording (called Screen Recording on older macOS) must include TinyRecorder. If it is on but recording still fails, open TinyRecorder Settings › General › Screen Recording Permission and click Repair….
My voice is missing
- Check the microphone box and the selected device. If the device list is empty, allow TinyRecorder under Privacy & Security › Microphone.
- If Record Microphone to Main Track is off, the mic is on a second track. Play the file in an editor that shows all tracks, or turn the setting on for the next recording.
The file won’t play or the audio is silent in another app
- The audio in a video uses the format set under Settings › Output › Audio Format. AAC in an MP4 file is the most widely supported combination. If an app or website rejects your file, record again with those settings.
App’s Audio is not shown
- System audio capture needs macOS 13 or later. On macOS 12.3 TinyRecorder records video and the microphone, but not system audio.
TinyRecorder vs the Screenshot toolbar, QuickTime + BlackHole and OBS
The Screenshot toolbar on macOS 27. Built in, nothing to install, and it can now include system audio. It records the entire screen, a selected window or a selected portion, and saves a MOV file. It has no app-only audio, no audio-only mode, and no MP4 or format choices.
QuickTime Player with BlackHole. BlackHole is a free, open-source virtual audio driver. You install it, create a Multi-Output Device in Audio MIDI Setup (your speakers plus BlackHole), make that your sound output, and pick BlackHole as the microphone in QuickTime. It is reliable once set up and works with any app that accepts an audio input. The trade-offs: the volume keys don’t work while the Multi-Output Device is your output, and you need to switch outputs back when you are done. Recording your voice at the same time needs an extra aggregate device. For a closer look at QuickTime, see QuickTime vs TinyRecorder.
OBS Studio. OBS is free, open source and very capable. On macOS 13 and later it captures desktop or single-app audio through ScreenCaptureKit, without a virtual driver. It is the better choice for live streaming, scenes with multiple sources, and detailed audio mixing. For a quick recording, it takes more setup: you build a scene, add sources and configure output settings before you record.
TinyRecorder. A small menu bar recorder: pick a screen, area, app or window, check App’s Audio, and record. No driver and no scene setup. It doesn’t stream, and it isn’t a video editor beyond a basic trimmer.
Next steps
- Download TinyRecorder (free, no account, no watermark).
- Record audio only: how to record system audio on Mac.
- See everything else it can do on the features page, or check the FAQ.