
To record system audio on Mac without video, click System Audio in TinyRecorder’s toolbar. It captures everything your Mac plays and saves it as an audio file in the format you choose, including lossless ALAC or FLAC. No BlackHole or other virtual audio driver is needed.
TinyRecorder is a free, open-source screen and audio recorder. System audio recording requires macOS 13 or later.
Why you need an app for this
macOS has no built-in way to record internal audio on its own, without video. QuickTime Player’s audio recording only accepts an input device such as a microphone. The Screenshot toolbar (⇧⌘5) can include system audio in a screen recording, but only from macOS 27 on, and only together with video (Apple’s guide). The traditional workaround is a virtual audio driver like BlackHole, routed through a Multi-Output Device in Audio MIDI Setup.
Since macOS 13, Apple’s ScreenCaptureKit lets an app capture system audio directly. TinyRecorder uses it, so your sound output stays as it is: your speakers or headphones keep working and the volume keys still work.
How to record system audio on Mac
-
Download TinyRecorder and open it. The first-launch guide asks for the Screen Recording permission, which macOS also uses for system audio. The app restarts once after you grant it.
-
Optional: open Preferences › Output and pick an audio format and quality (see below).
-
In the toolbar, leave the small microphone checkbox on the System Audio button unchecked if you only want the Mac’s sound.

-
Click System Audio. Recording starts right away, or after the countdown if you set one.
-
Play whatever you want to capture: a browser tab, a music app, a call, a game.
-
Click the stop button in the menu bar.
TinyRecorder records all sound your Mac plays during that time. To capture only one app’s sound together with its window, use Application mode instead, as described in how to screen record on Mac with internal audio.
Choose a format and quality
Open Settings › Output. The Audio section has two settings that apply to audio-only recordings.
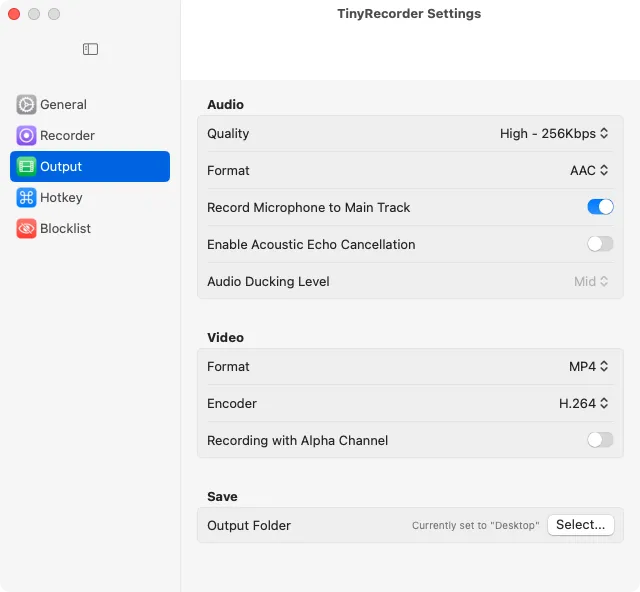
Format
| Format | File | Good for |
|---|---|---|
| AAC | .m4a |
Default. Small files, plays almost everywhere. |
| MP3 | .mp3 |
Older players, car stereos, upload forms that ask for MP3. |
| Opus | .ogg |
Smallest files at a given quality; less widely supported. |
| ALAC (lossless) | .m4a |
Bit-exact archive copies; plays in Apple Music and QuickTime. |
| FLAC (lossless) | .flac |
Lossless files for use outside the Apple ecosystem. |
Quality sets the bit rate for the compressed formats: Normal (128 kbps), Good (192 kbps), High (256 kbps) or Extreme (320 kbps). High is a good default for music and speech. For ALAC and FLAC the setting shows Lossless and can’t be changed, because nothing is thrown away.
Lossless files are several times larger than AAC. Use them if you plan to edit or re-encode the audio later; use AAC or MP3 for files you just want to listen to or share.
Record system audio and microphone on Mac
To add your voice, for example to record a call or narrate over a video, check the microphone box on the System Audio button and choose a device from the menu next to it. Then click System Audio as before.
With the microphone on, TinyRecorder saves a .qma package instead of a single file. It holds the system sound and your microphone as two separate tracks, so you can balance them after the fact.
What happens next depends on Record Microphone to Main Track in Settings › Output:
- On (default): after you stop, TinyRecorder also mixes both tracks into one ordinary audio file in your chosen format, saved next to the
.qmawith the same name. Most people can use that file directly and keep the.qmain case they want a different mix. - Off: you get only the
.qmapackage.
Adjust the mix in the built-in player
Double-click a .qma file to open it in TinyRecorder’s player. It has a play/pause button and two volume sliders, one for system audio and one for the microphone, each adjustable up to 400%. If your voice is too quiet next to the music, turn the mic up or the system audio down and listen again.
Click Save Changes to store the new levels in the package, or Export to write a single mixed file. The export dialog has an Export as MP3 checkbox if you need an MP3.
If you use speakers instead of headphones, the microphone also picks up the system sound. Wear headphones, or turn on Enable Acoustic Echo Cancellation in Settings › Output.
Where recordings are saved
Recordings go to your Desktop by default, named by date and time, for example Recording at 2026-11-05 14.30.12.m4a. Change the location under Settings › Output › Output Folder.
When a recording finishes, TinyRecorder shows a small floating preview in the corner of the screen, or a “Recording Completed” notification if you turned the preview off in Settings.
If something doesn’t work
The file is silent
- Check that the app was actually playing sound and wasn’t muted. TinyRecorder records the audio apps send out, so a muted tab records silence.
- Check System Settings › Privacy & Security › Screen & System Audio Recording (Screen Recording on older macOS). TinyRecorder must be turned on. If it is on but recordings still fail, open TinyRecorder Settings › General › Screen Recording Permission and click Repair….
The System Audio button is missing
- System audio needs macOS 13 or later. On macOS 12.3 TinyRecorder can record video and the microphone, but not system audio.
My microphone isn’t listed
- Allow TinyRecorder under Privacy & Security › Microphone, then reopen the toolbar. Reconnect USB or Bluetooth mics and pick them from the device menu.
I got a .qma file and my app can’t open it
- A
.qmais TinyRecorder’s multi-track package. Open it in TinyRecorder and click Export, or turn on Record Microphone to Main Track so a mixed file is created automatically next time.
Another app won’t play the file
- Opus and FLAC are less widely supported than AAC and MP3. Switch the format to AAC or MP3 in Settings › Output for the next recording.
Next steps
- Download TinyRecorder. It’s free, needs no account and has no time limit.
- Need video too? Read how to screen record on Mac with internal audio.
- Comparing options? See QuickTime vs TinyRecorder or the features page.